Monday, May 30, 2011

Chocolate Chip Scones


At breakfast, bakeries and coffee shops, scones are kind of the underdog. Usually passed up for a muffin a or bagel, the lonely scone sits in that glass case rejected and under appreciated. Because I have never made scones before (and am also guilty of favoring the cliche muffin or bagel) I decided to give it a try. I had only had about two scones in my life, the first made fresh at an adorable little tea and sandwich shop by my old boarding school and the second before accounting class when they had run out of everything else (go figure). I've been trying to bake entirely new and different things for a change, so I thought scones would be a perfect place to start.They are actually pretty simple but do take a little time if you don't have fancy pastry-making equipment (like myself). I did my research and used a compilation of different recipes and techniques to come up with my own.


Ingredients
2 cups all purpose flour
1 teaspoon baking powder
1/4 teaspoon baking soda
1/3 cup of sugar, plus about 2 tablespoons 
1/2 teaspoon salt
8 tablespoons unsalted butter, frozen and cubed
1/2 cup sour cream
1 large egg
2 cups semisweet chocolate chips
about 2 tablespoons of milk (whole is best but 2% will suffice) 

Directions
Preheat the oven to 400°

You should have two bowls: one large and one small-ish/medium. The large bowl is for your dry ingredients and the smaller bowl is for your wet ingredients. 

In the large bowl, combine the flour, sugar, baking soda, baking powder and salt. Stir the dry ingredients so they are all pretty well combined. Then add the frozen cubes of butter, making sure the butter does not stick to itself. With two knives (unless you have a pastry blender) "cut the butter" into the dry flour mixture. To do this, hold a knife in each hand and cut across the bowl so the knives form an "x". Continue to do this until the butter is well incorporated and looks like course crumbs. This actually takes a while so don't try and rush through it.

Add the chocolate chips to the dry mixture

In the smaller bowl, whisk together the sour cream and egg. Make a crater in the center of the dry ingredients and pour in the wet sour cream mixture. Use a fork to mix the wet and dry together, then your hands to completely combine all of the ingredients. Don't over mix! 

Flour a dry surface and knead the dough 4 or 5 times. Then press the dough into about a 6 inch or so circle. It should look like a giant cookie. With a knife, cut the dough into 8 pizza looking slices.
Place the scone slices on a greased cookie sheet about 2 inches apart. Brush milk on top of each scone and sprinkle (regular white!) sugar on top. Bake for 15-17 minutes (I baked for 16). 

When the scone are fresh out of the oven, sprinkle a liberal amount of sugar on top of each scone so the sugar sticks. If you wait too long the sugar will not stick to the top of the scones. Serve immediately!Store in an airtight container. If eaten the next day, microwave for about 25 seconds.

I wanted to try two different techniques on this one recipe because I thought the first ones I made didn't look golden enough. After I took the scones out of the oven, I took a couple of them and brushed more milk on top and sprinkled them with brown sugar (instead of regular white). I popped then back into the oven for about 3 or 4 minutes. I decided this was completely unnecessary. 16 minutes was perfect and the brown sugar didn't make them taste or look any better. They weren't terrible or burnt, but they just weren't as good as the first. 

this recipe was inspired by Joy of Baking and Allrecipes.com


Saturday, May 28, 2011

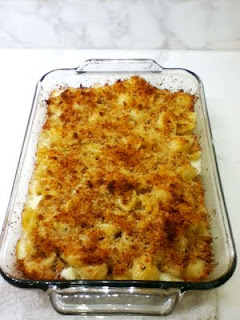
3 Cheese Mac and Cheese

3 Cheese Baked Mac and Cheese with Fontina, American and Parmesan

My grandmother Mimi always has a medley of classics at the Bruno family lunch table, and mac and cheese is one of them. Unfortunately, its not that great. I mean don't get me wrong, it's good. But its not something i'd day dream about. My father also claims that he makes a stellar mac and cheese. Although my dad is a great cook, sorry pop, but your mac and cheese doesn't really fit the bill either. Therefore I have decided to take some responsibility and search for the BEST baked mac and cheese recipe out there. Enough is enough. If we insist upon having mac and cheese at every major holiday, then it better be some damn good mac and cheese, right? I found a recipe via food gawker (which is like internet crack for the food obsessed, like myself) that tweeked a little. It may not be the best recipe ever, but it definitely has potential.


This is based off of a recipe I found on Annie's Eats which you can find here

Ingredients
1 lb (1 bag) small pasta shells
4 tablespoons divided, plus another tablespoon melted
1 cup heavy cream
1 cup Fontina Cheese
1 cup American Cheese
1/4 Parmesan Cheese 
1/2 teaspoon of nutmeg
1/3 cup Italian bread crumbs
Salt and Pepper to taste

First I want to start by saying I think this recipe turned out slightly dry, so I would suggest another cup of heavy cream and at least a half a cup of both cheeses. Also, unless you are wild about bread crumbs, I would reduce the bread crumbs to at least 1/4, if not less. OR just don't bake it at all or add the bread crumbs. I thought it tasted pretty good before the baking happened (minus the fact that the shells where undercooked)

Aight to the directions:
Preheat the oven to 400˚ F and cook the pasta according to the packaging until slightly undercooked. (my bag said 10 minutes so I cooked it for about 6 1/2 minutes) If you don't plan on baking the mac and cheese, then cook the pasta completely. Butter a casserole dish (2 -quart) and set aside.
Put the 4 tablespoons of butter in a large mixing bowl and microwave the cream for about 40 seconds. When the pasta is finished, add it to the bowl and stir until the butter is melted. Then add the cream and cheeses and stir until the cheese has basically melted. (so here is where you can either stop or keep going - it's up to you)
In a small bowl, mix together the melted butter, Parmesan cheese and bread crumbs. Pour the pasta into the casserole dish and sprinkle the bread crumb mixture on top until it is completely covered.
Bake until the top is golden brown, about 20 minutes. Enjoy!


Wednesday, May 25, 2011

Shrimp and Oyster Pasta in a Garlic Butter Sauce


This recipe has few ingredients and is beyond simple to prepare. It was a pretty big hit, especially with my little brothers - one of which was never willing to try an oyster until now (I'd say that's a pretty big success considering the young lad pretty much only eats Swedish fish and cereal AND he ate more than one. winning) 

Ingredients
A dozen Shrimp
A dozen oysters
About 2 teaspoons of finely chopped garlic
angel hair pasta (my favorite!)
butter
olive oil
Parmesan cheese 
salt and pepper to taste

First you boil the pasta with water along with the remaining juices from the oysters (you know, the gross looking liquid they are floating in when you buy them from the grocery store) so the pasta soaks up the delicious fishy flavors (this was my dads idea. it actually made a big difference and added a nice saltiness too). In the mean time, saute the shrimp in a pan with the garlic and a couple of tablespoons of butter and olive oil (I like using both but it's up to you). When those are finished cooking, remove them and set them aside. Then toss in the oysters (there should still be some juice with those as well). These cook in pretty much two seconds so remove them the second they turn greyish so they don't get tough. When your pasta is finished cooking, drain it and toss it in the saute pan with the leftover butter and olive oil (you can also add more butter and oil of course because the pasta tends to dry up a bit and stick together after it has been drained) and add salt and pepper to taste. Then put the pasta in a bowl and garnish with your shrimp, oysters and Parmesan cheese. pretty simple (and delicious too)!